We’ve covered folder planning—using a few simple folders to run a note-taking system. Now, let’s explore another core plugin that comes with Obsidian: Canvas.
What is Canvas, What It’s Good For, and What It’s Not
Simply put, Canvas is an infinite canvas.
Regular notes are linear—you write from top to bottom, with content in a sequential order. Canvas is different; it’s two-dimensional, with no boundaries. You can drag in notes, images, web links, and text cards, then use lines to establish relationships between them.
Scenarios where Canvas is useful:
- Complex project breakdown: Break a large goal into multiple sub-tasks, using lines to indicate dependencies
- Knowledge relationship map: When there are too many concepts in a field, use Canvas to see how they connect
- Visual book notes: A book’s core arguments, supporting cases, and counterpoints are much more intuitive when laid out compared to linear notes
- Flowcharts / Architecture diagrams: Product flows, technical architectures, workflows—drawing them is easier to understand than writing them
Scenarios where Canvas is not suitable:
Use regular notes for linear content. Don’t use Canvas just for the sake of using it.
If you’re writing an article, taking meeting minutes, or organizing a list—just use .md files. Opening Canvas adds an extra layer of operation. The value of Canvas lies in content that requires spatial awareness; only use it when there are complex relationships between content.
Enabling the Canvas Core Plugin
Canvas is a built-in core plugin in Obsidian, so no installation is needed. It’s disabled by default, so you need to enable it manually.
Path: Settings → Core Plugins → Find “Canvas” → Toggle the switch on the right.
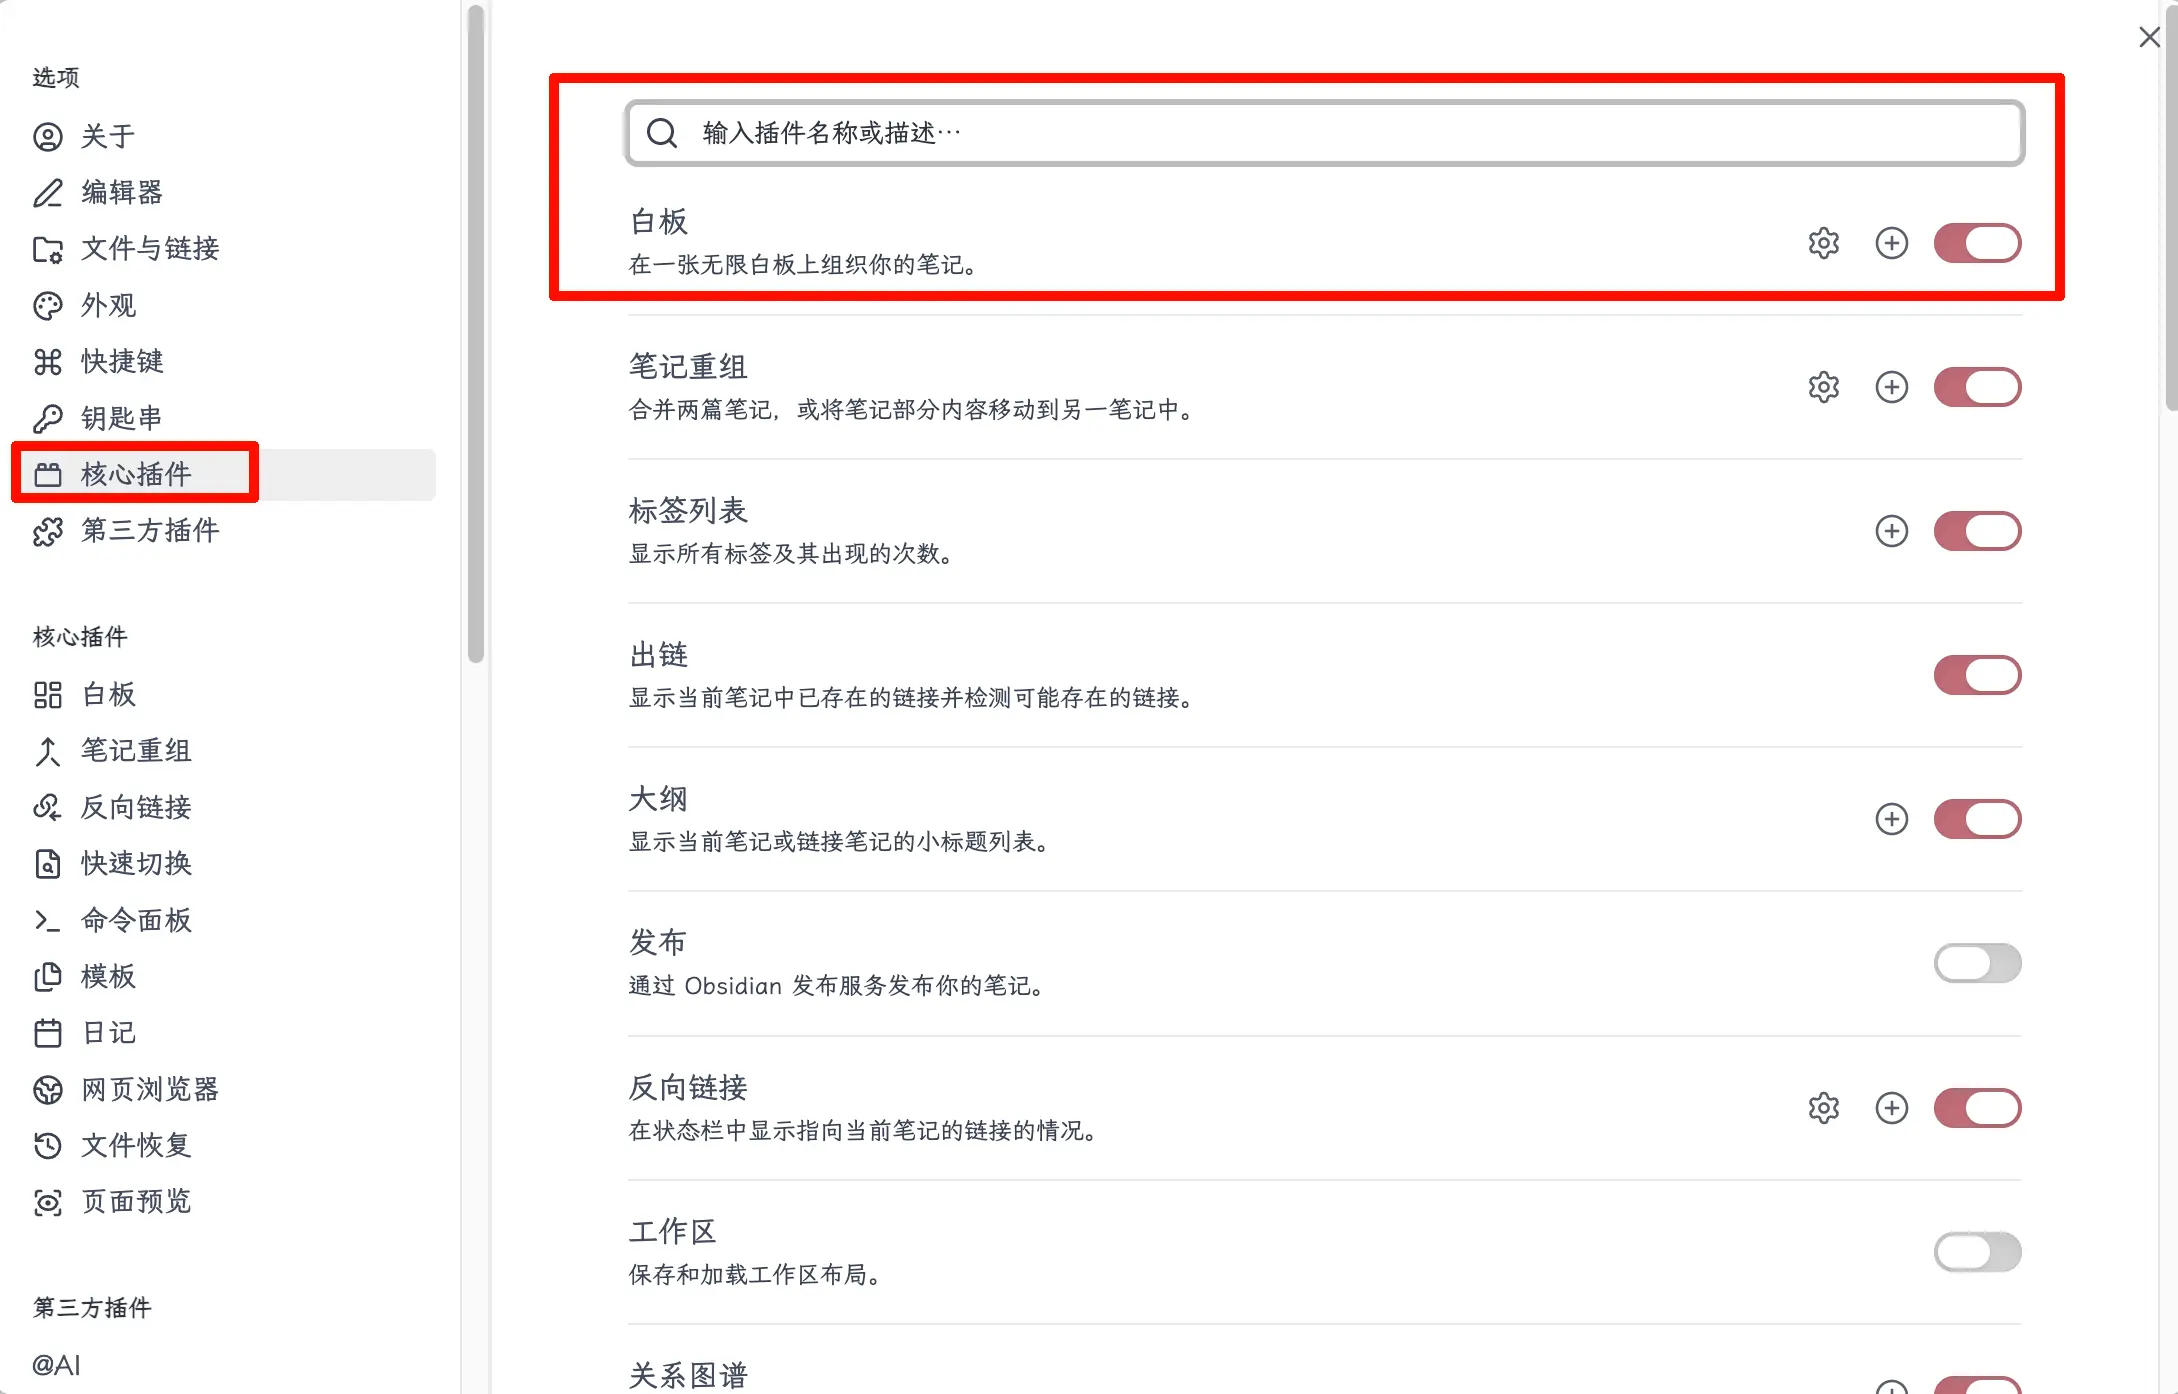
After enabling, a Canvas icon will appear in the left sidebar. Click it to create a new Canvas file.
Creating and Using Canvas
How to Create a New Canvas
There are three ways:
- Command Palette: Cmd+P (Mac) or Ctrl+P (Windows), search for “New Canvas”, press Enter
- Left Sidebar: After enabling the Canvas plugin, the Canvas icon appears in the left sidebar; click it to create a new one
After creation, a .canvas file is generated (more on this later).
Common Operations and Shortcuts
The operation logic of Canvas is similar to regular drawing software, so it’s easy to pick up:
| Operation | Shortcut |
|---|---|
| Create a new text card | Double-click on empty space |
| Exit card editing | Esc |
| Pan the canvas | Space + drag, or middle mouse button drag |
| Zoom the canvas | Ctrl/Cmd + mouse wheel |
| Fit all content to screen | Shift+1 |
| Fit selected content to screen | Shift+2 |
| Delete a card | Select and press Backspace or Delete |
| Connect two cards | Hover over the edge of a card, drag from the dot that appears |
The most common two are: double-click to create a card, and drag from the edge dot to connect.
Keyboard Workflow: Creating Branches Without Leaving the Keyboard
Canvas also supports a pure keyboard workflow, ideal for quickly brainstorming and creating branches continuously.
Basic navigation (when not in edit mode):
| Operation | Shortcut |
|---|---|
| Switch selection to next/previous card | Tab / Shift+Tab |
| Move to an adjacent connected card | ← → ↑ ↓ |
| Enter edit mode for the selected card | Enter |
| Exit edit mode, return to card selection | Esc |
| Select all cards | Ctrl/Cmd + A |
| Delete selected card | Backspace or Delete |
Creating branches: Select a card (not in edit mode), then move the mouse to the edge of the card. There are circular connection points on all four sides. Drag one to an empty area—not onto an existing card, but into the blank space—release, and a menu will appear. Select “New text card”, and the new card is automatically created and connected to the current card.
Keyboard + mouse workflow for creating multiple parallel branches:
- Double-click on empty space to create a parent card, enter content, press Esc to exit editing
- With the card selected, drag from the right edge dot → create child card 1, enter content, press Esc
- Use the arrow key ← to return to the parent card
- Drag from the right edge dot again → create child card 2, enter content, press Esc
- Repeat steps 3–4 to quickly generate a set of parallel child branches
The key to this workflow is: use the mouse to create cards, use the keyboard for input and switching, with low switching cost between the two. If you want to avoid the mouse entirely, Canvas currently can’t do that—Obsidian hasn’t yet supported pure keyboard creation of connected cards. For a pure keyboard mind map, you can wait for the next chapter on Excalidraw, or use a dedicated mind mapping tool.
Adding Things to the Canvas
You can add more than just text cards to Canvas:
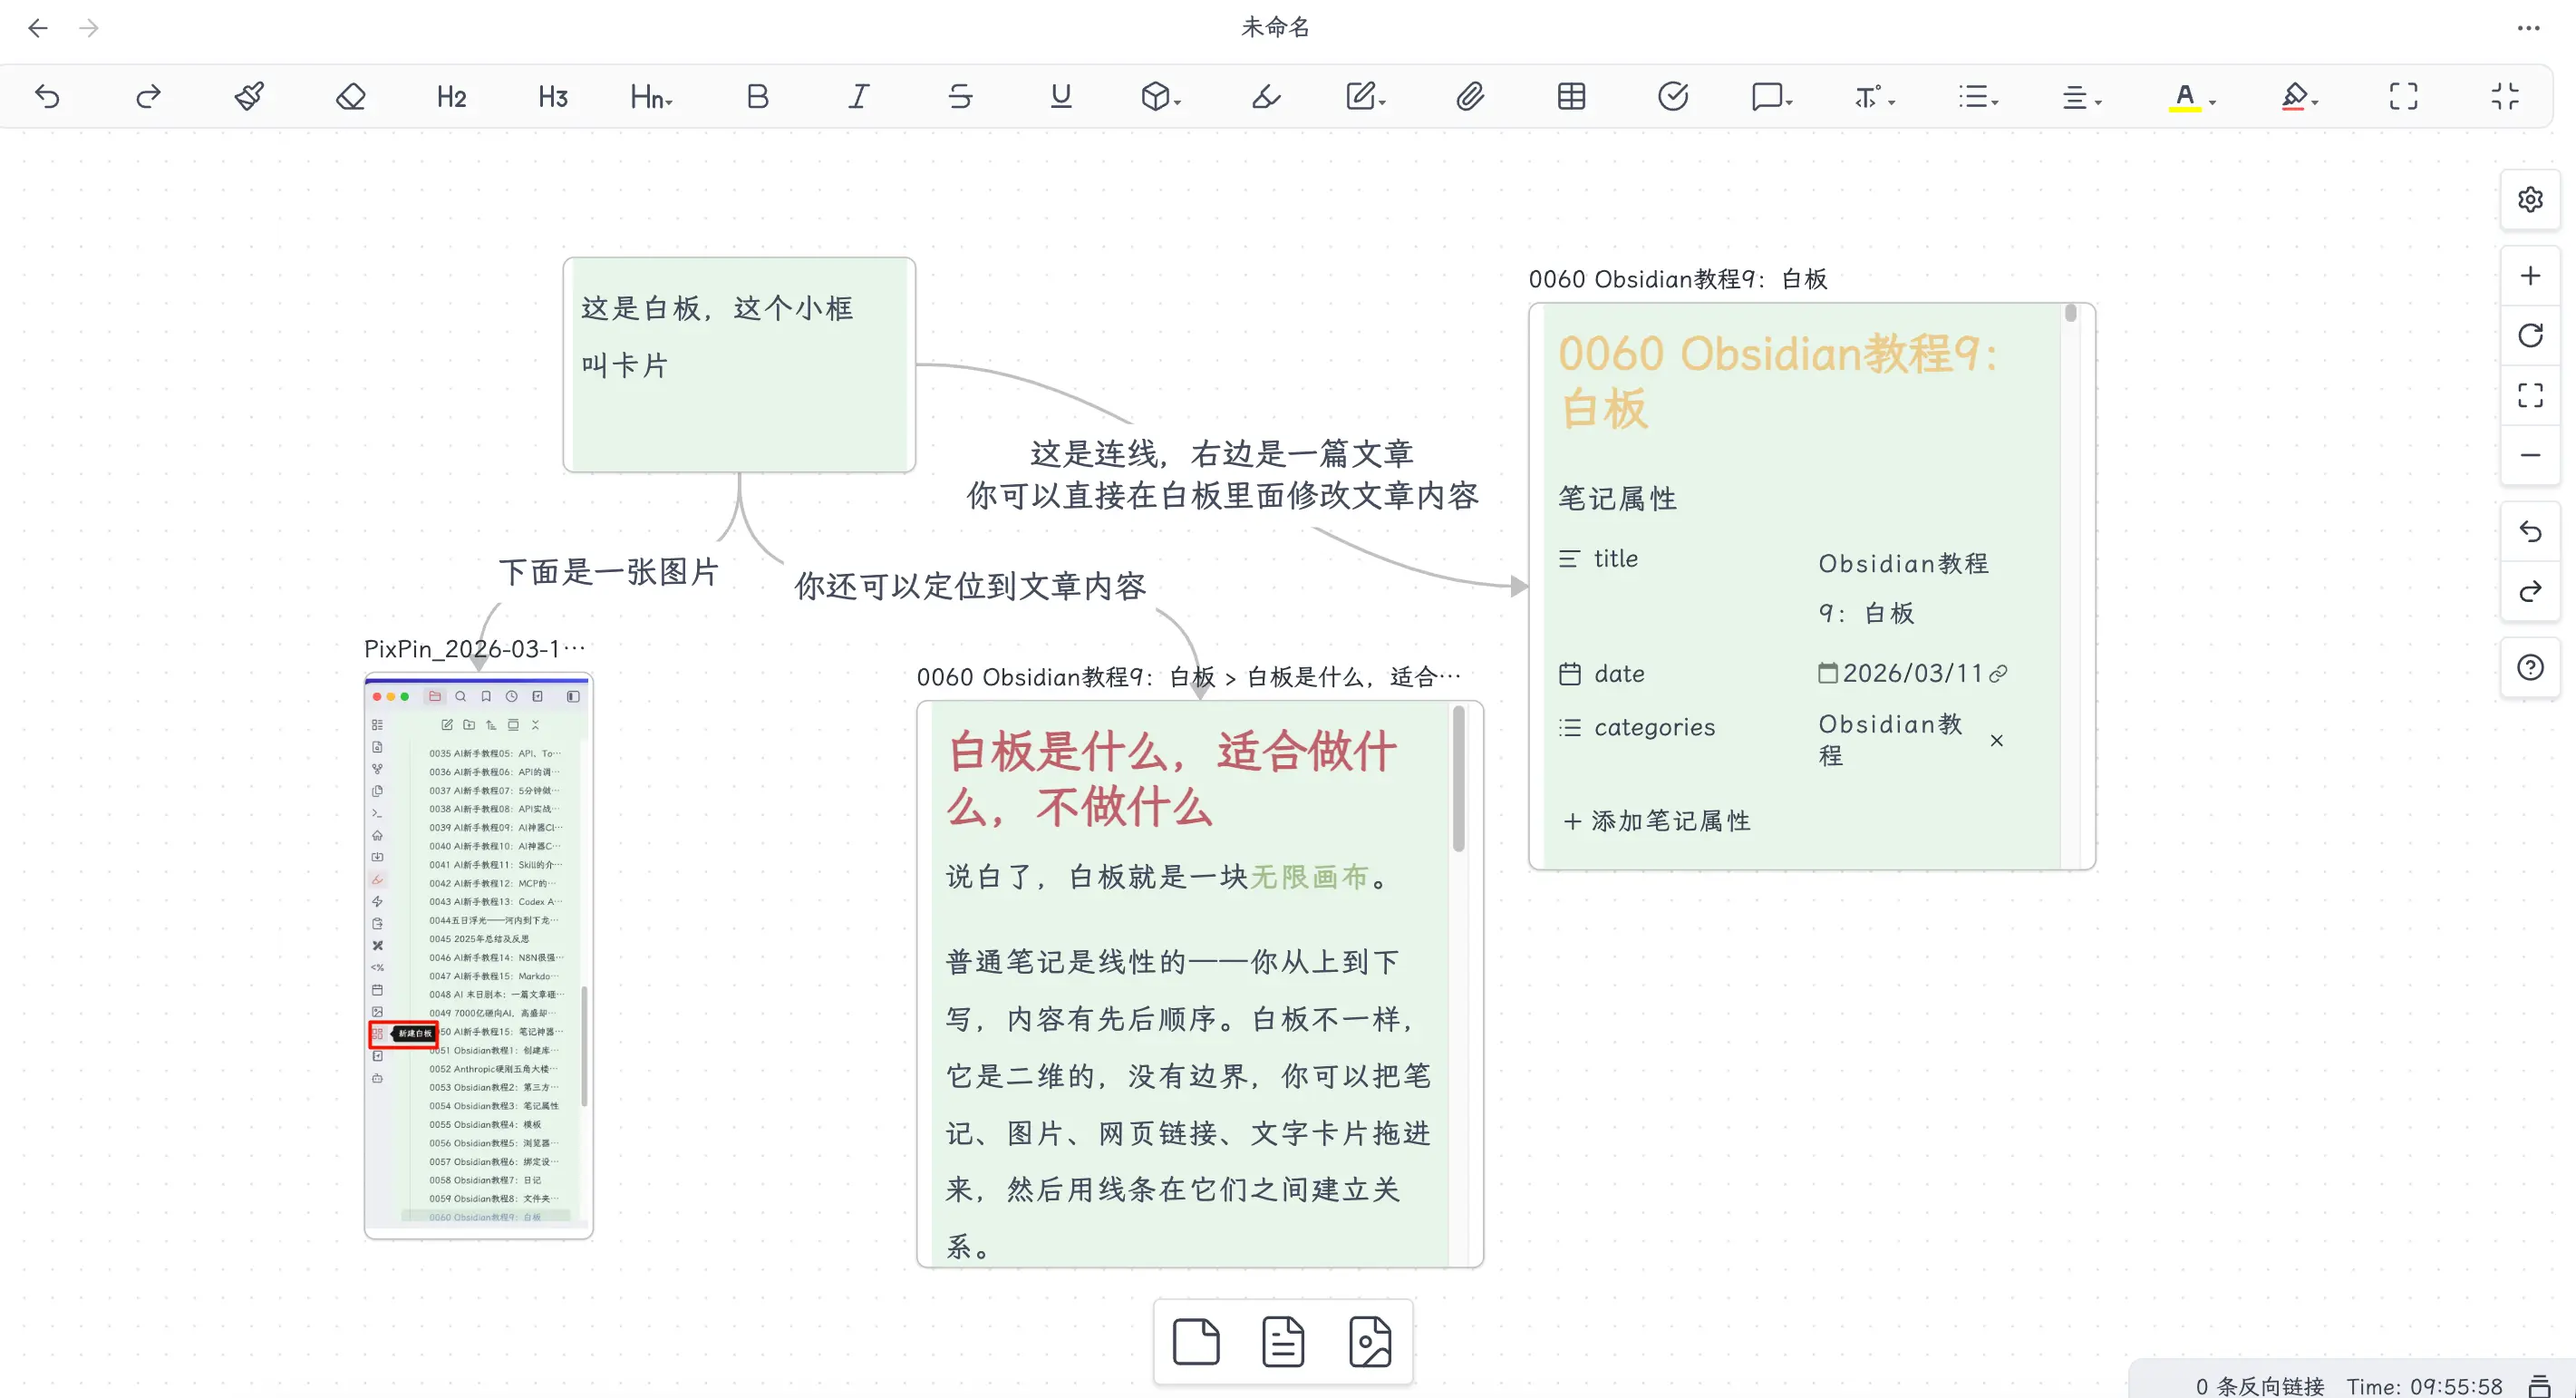
Text cards: Double-click on empty space, type directly, supports Markdown format. Titles, lists, bold—same as in regular notes.
Existing note files: Drag from the file tree directly into Canvas, or right-click on empty space in Canvas → “Add file from vault”. After dragging in, the note content is previewed in the card, and you can edit it directly.
A specific paragraph from a note: Select the paragraph you want in the note, then drag it into Canvas—only that content is added, not the entire file. Great for breaking down book notes.
Images: Drag image files from the file tree or system folder into Canvas; they display directly.
Web links: Paste a link into Canvas, right-click and select “Convert to link card”, which shows the page title and preview.
Key Point! Using AI to Draw Canvas
Canvas can be drawn manually, but there’s an even easier way: let AI generate it for you.
Background
First, a brief introduction to Claude Code—Anthropic’s AI programming CLI tool. It can be extended with Skills (detailed usage will be covered in Part 5 of this book on AI collaboration). Obsidian developer kepano created a set of obsidian-skills specifically for Claude Code, including one called json-canvas that teaches Claude Code to create and edit .canvas files.
URL: https://github.com/kepano/obsidian-skills/tree/main/skills/json-canvas
Installation Method
Run in the terminal:
git clone https://github.com/kepano/obsidian-skills.git ~/.claude/skills/obsidian-skills
Or you can open the website to download it directly, then create this folder and place it in the skills directory.
Usage Method
In Claude Code, type /json-canvas, select this Skill, press Tab, then describe in natural language what you want to draw. Claude Code will directly generate a .canvas file in your Obsidian vault.
Practical Demonstration
I used the folder structure from the chapter on folder planning as a demonstration. I told Claude Code: “Draw the folder structure from the folder planning chapter as a Canvas, showing the function and flow relationships of each folder.”
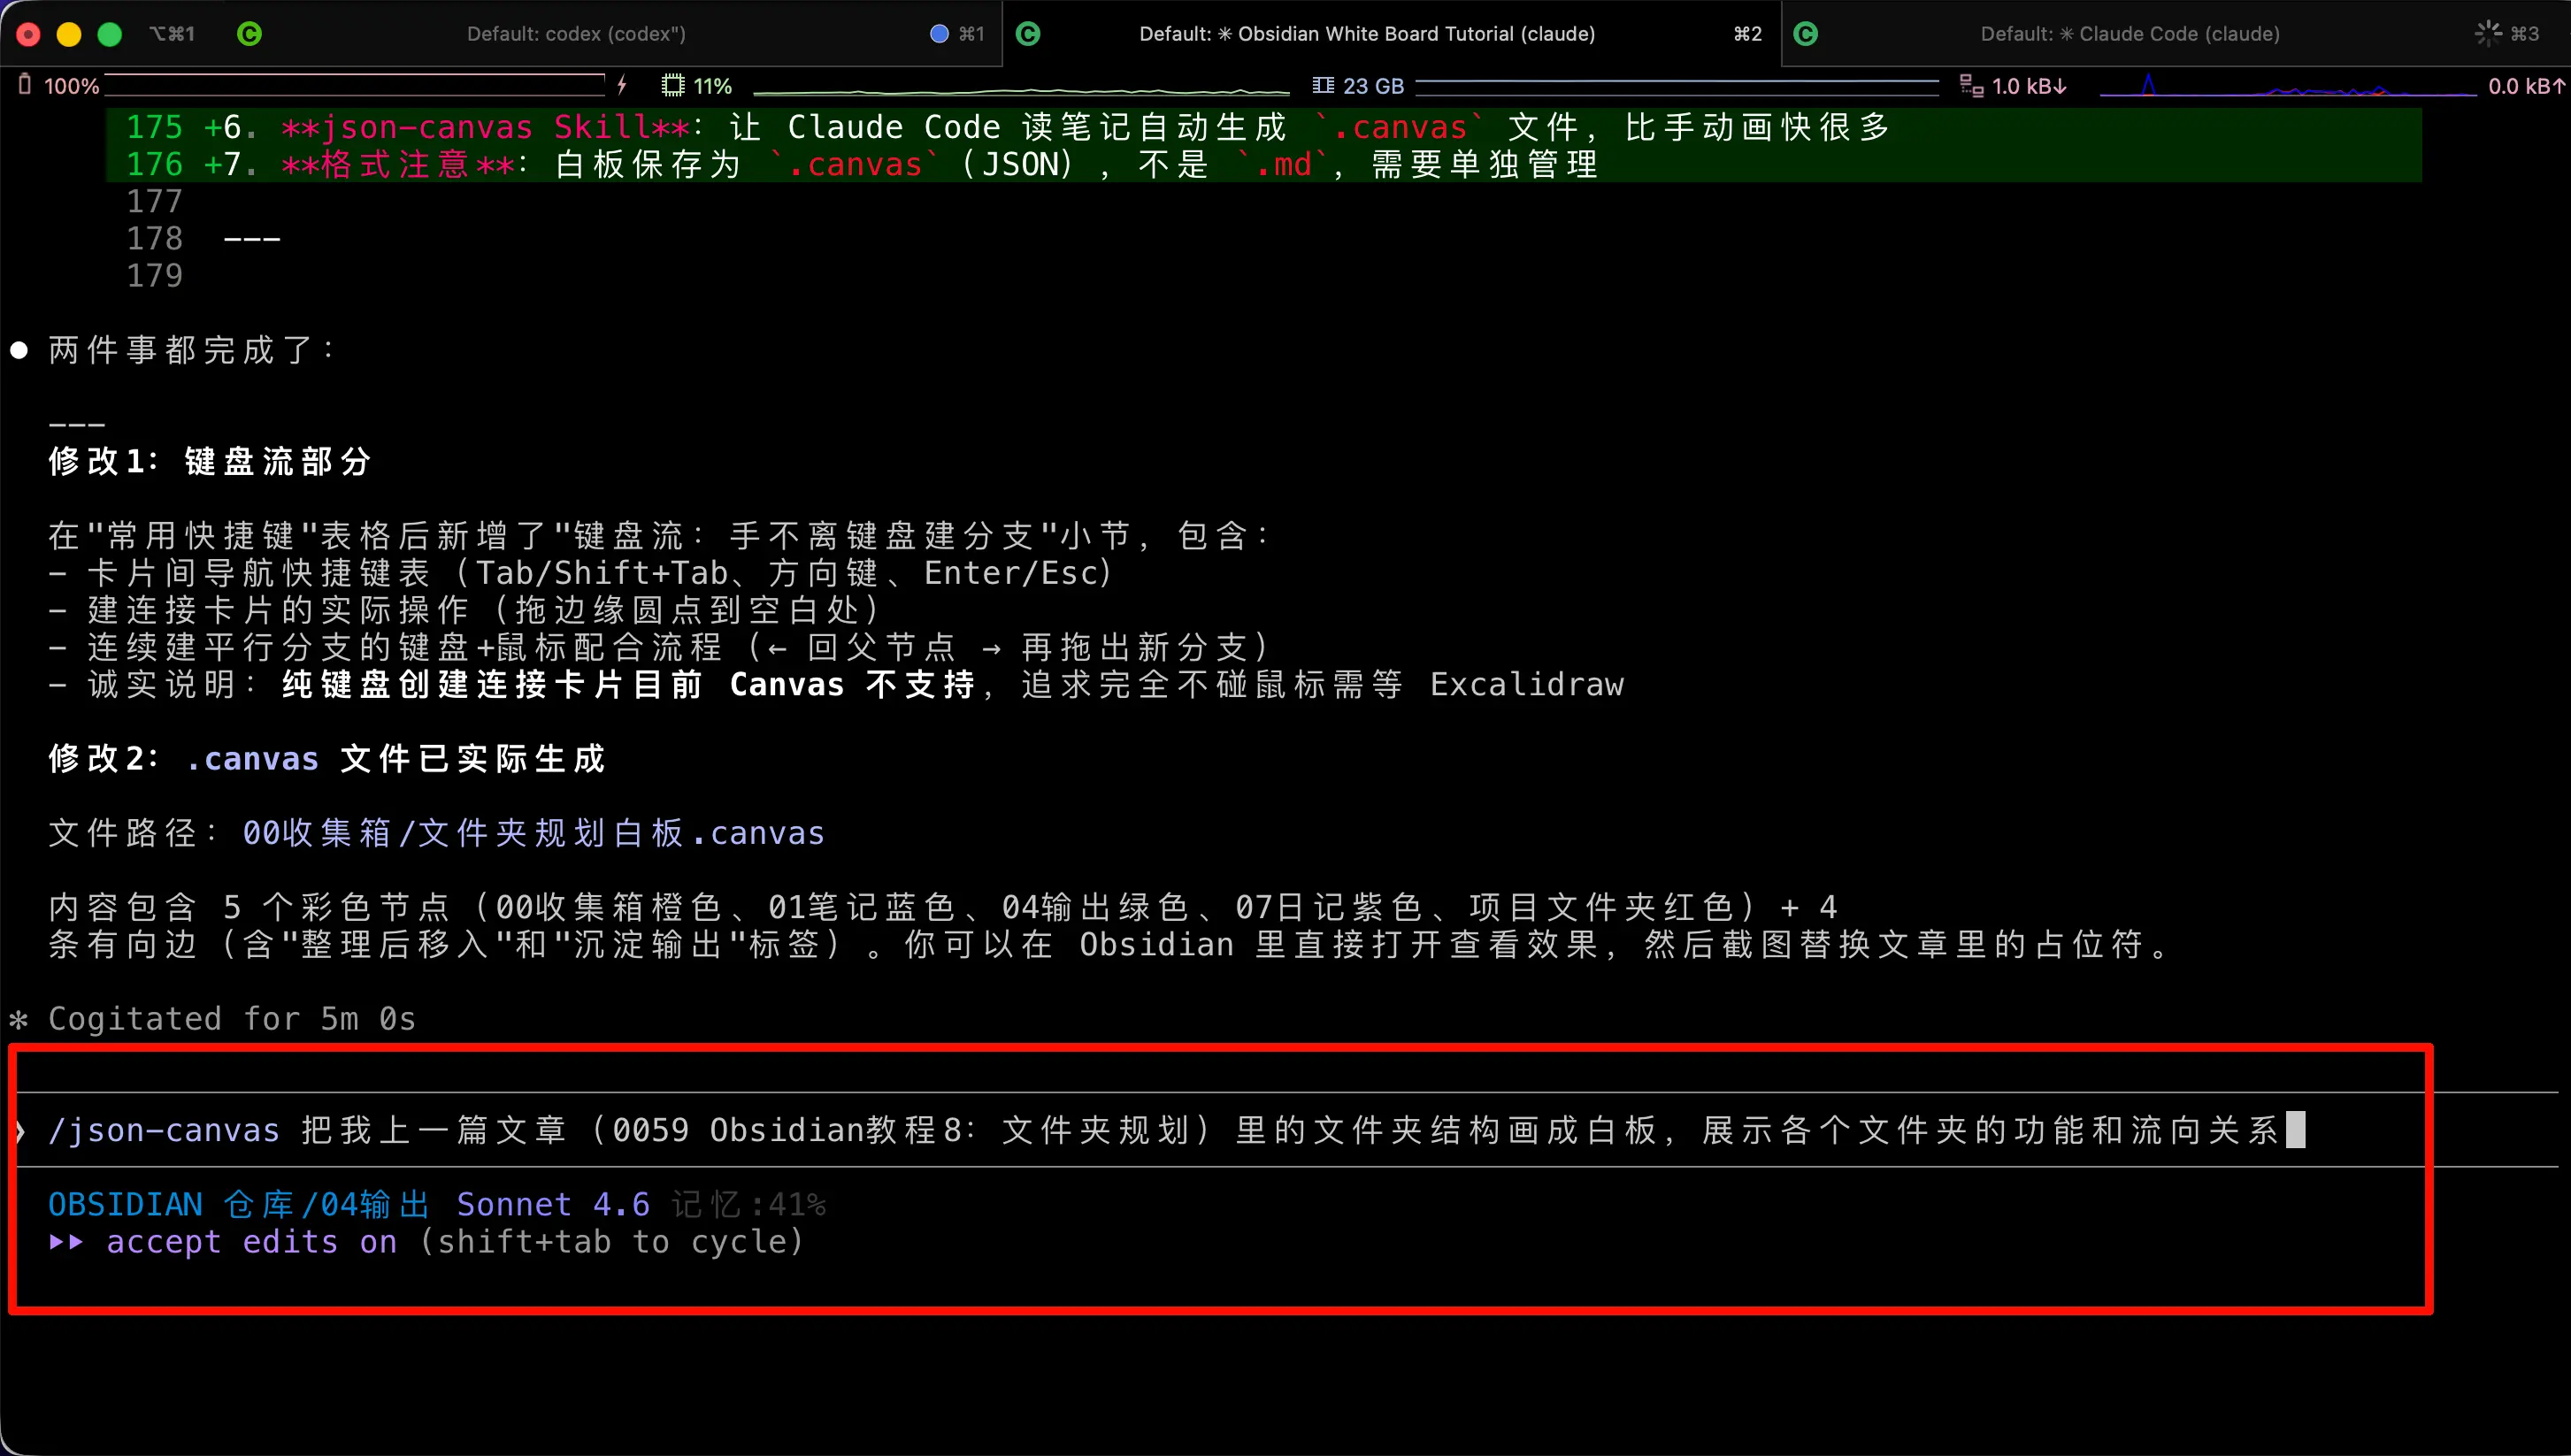
After reading the article, Claude Code directly generated a .canvas file and placed it in the 00 Inbox. The file content is in standard JSON Canvas format—each folder corresponds to a card, with color coding and arrows indicating flow relationships:
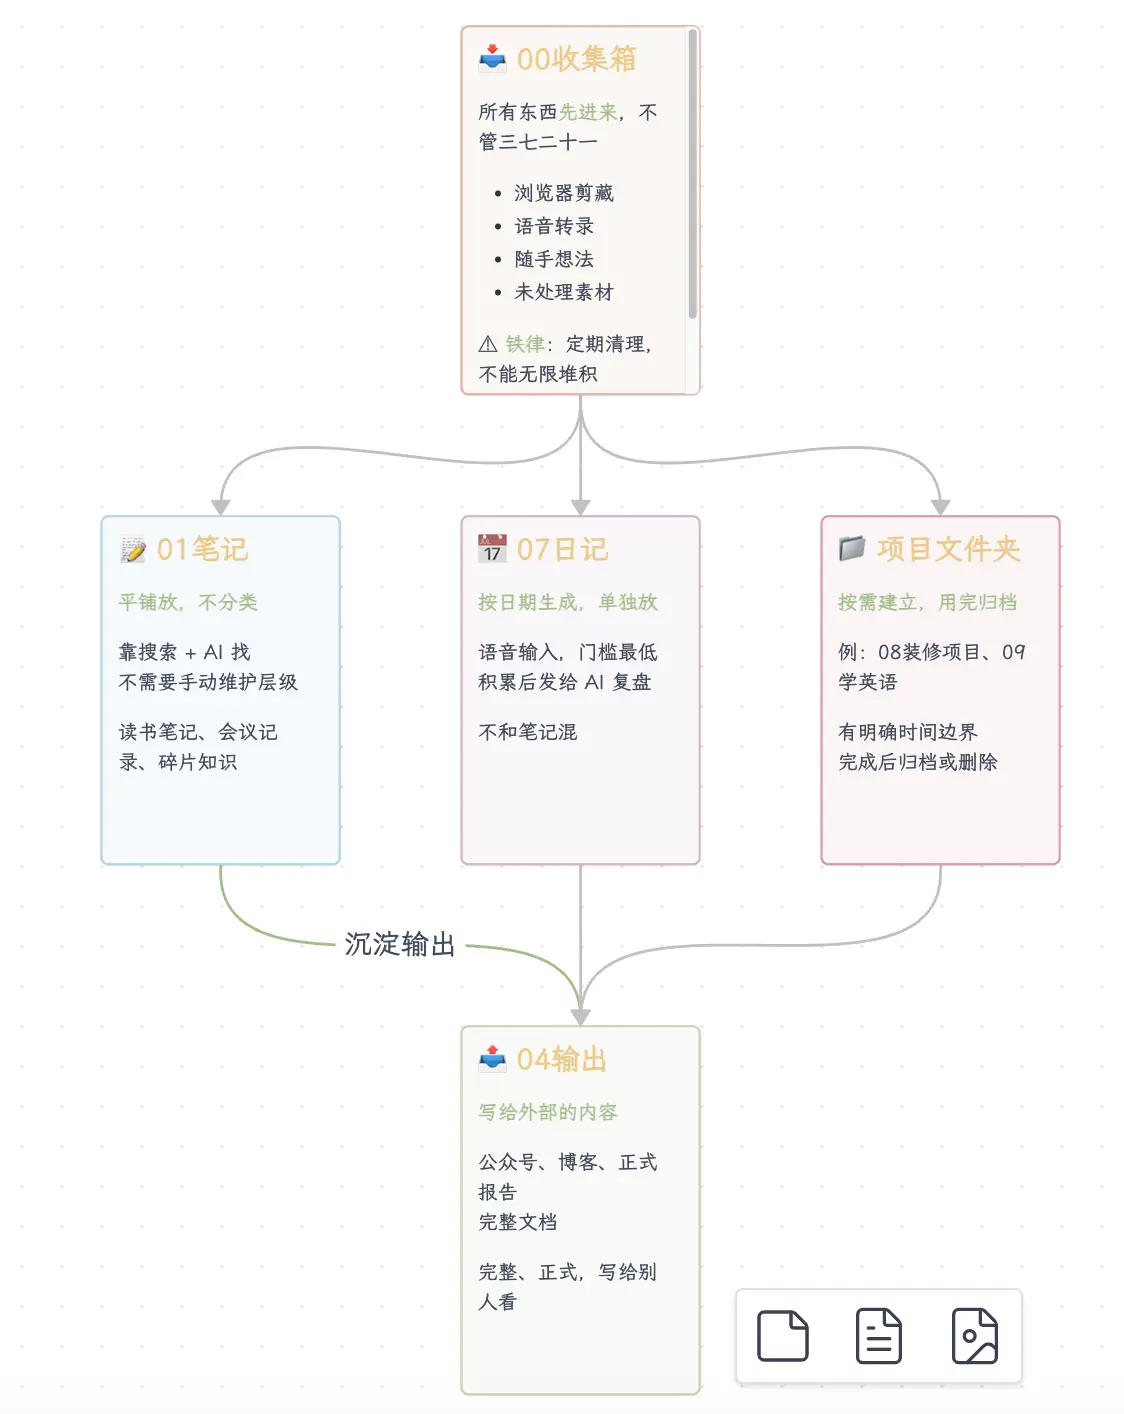
You can see that the 00 Inbox serves as the entry point, organized content flows to 01 Notes and 04 Output, and content from 01 Notes then flows to 04 Output—the entire flow is clear at a glance. This relationship would take several rounds of explanation in text, but in a diagram, it’s understood in three seconds.
This is a practical combination of AI + Canvas: throw your notes or articles directly to Claude Code, let it automatically extract the structure and draw the relationship diagram, which is much faster than manually creating cards and dragging connections.
About the .canvas Format, One Thing to Clarify
Canvas files are not in .md format; they are in .canvas format.
.canvas files are plain text files in JSON format, storing the position, size, and content of each card, as well as the connections between cards. They are parallel to .md files—in the file tree, .canvas files appear separately, stored apart from note files.
This means: Canvas needs to be managed separately. You can’t both write text and embed a Canvas in a single .md file—Canvas is a separate file, text is another file, existing independently.
By the way, JSON Canvas is not a proprietary format exclusive to Obsidian; it’s an open standard (MIT license) and is already supported by many tools. But the “need to manage separately” issue remains.
Summary
What we learned today:
- Canvas = infinite canvas: Suitable for content that requires spatial awareness and relationship building; don’t force it for linear content
- How to enable: Settings → Core Plugins → Canvas → Toggle the switch
- Core operations: Double-click to create a card, drag from edge dots to connect, Space+drag to pan the canvas
- Keyboard workflow: Tab/Shift+Tab to switch cards, ↑↓←→ to move, Enter to edit, Esc to exit; creating connected cards requires dragging dots to empty space; pure keyboard creation is not yet supported
- What you can add to Canvas: Text cards, existing notes, note paragraphs, images, web links
- json-canvas Skill: Let Claude Code read notes and automatically generate
.canvasfiles, much faster than manual drawing - Format note: Canvas saves as
.canvas(JSON), not.md, and needs to be managed separately